Rick Mur

Limitless Networking

Page 10 of 10

Fast Restoration on IP – MPLS Fast ReRoute

Service providers that have a lot of real-time traffic through their network, like mobile network operators (MNOs), are very keen on a fast restoration of service once a failure occurs in the network. In the past a lot of networks were based on SDH/SONET transport networks, which took care of sub-second (50ms) failovers. Nowadays Ethernet is THE standard for any transport within a service provider network. This introduces an issue, as Ethernet is not built for automatic failover when certain things fail.

Now there are many ways to solve this and I want to dig deeper in these technologies in several posts.  I will discuss various protocols that can solve the fast restoration requirement in different ways. Some are used in local situations (so failover to local neighbor, like a twin sibling) and others can be used in inter-site locations or can be an end-to-end protection for certain traffic.

The posts are broken down as follows:

  1. MPLS Fast ReRoute (this post)
  2. IP Loop Free Alternate
  3. BGP PIC Core/Edge
  4. Hierarchical Forwarding

Please be aware that these technologies are all related to fast restore the layer 3 forwarding path, therefore restoring the MPLS forwarding path. The MPLS forwarding path may be used for layer 2 forwarding as well. What these posts do not cover is fast restoration on layer 2 level. With the current “cloud” initiatives and next generation datacenter networks we have some extensive options for layer 2 failovers.

I can (and probably will :)) write another blog post series on those kinds of failover mechanisms.

The current blog posts are focused on the Core service provider routing to offer resilient paths through the core layer 3 or MPLS cloud in the service provider network.

MPLS Fast Reroute introduction

When MPLS was invented the first application apart from fast packet switching was creating dedicated ‘circuit-like’ connections through the network. This was done using the RSVP protocol that signals a PATH message through the network and each hop reports a label back, creating an end-to-end label switched path (LSP) according to a pre-defined path through the network.

When this initial (unidirectional) path is set-up through the network, all traffic can be send through it. Now in case of a failure we want to protect this primary path. The path is signaled with either static next-hops or the ingress node can use the IGP database to calculate the path.

Be aware that your IGP needs support for this and it needs to be a link-state protocol (OSPF or IS-IS) as then every router has a full overview of the connections in the network. I will not go in to very much detail on how RSVP works and how it utilizes the IGP database to perform a C-SPF calculation. If you want I can spend another blog about this. Just leave a comment :).

Now we have a path that we can use for our traffic we want some protection. MPLS FastReroute (or FRR) is a technique that ensures this RSVP signaled path is protected. There are a couple ways to do this.

Protection

There are three ways to protect the path:

  • Link protection
  • Node protection
  • LSP protection / end-to-end protection

It very much depends on your network topology and what you want to accomplish as far as path protection. Then there are two ways of ensuring the protection. One is a manual protection where the backup path is manually configured and signaled as an additional tunnel through the network. The second is automatic, where the router figures out which links to use for the protection and automatically signaling those paths through the network.

Why do we need it? Well the technology is introduced to ensure equal failover times as with SDH/SONET transmission networks. When using a LDP network, you need to wait for IGP convergence before the new path is ready for traffic. During tests I found out that this takes around 300-400ms when using core routing platforms (Juniper MX, Cisco ASR9k).  When using MPLS FRR you reduce this to around 50ms as the routers already have a backup path ready that should already be programmed in the relevant ASICs.

Link protection

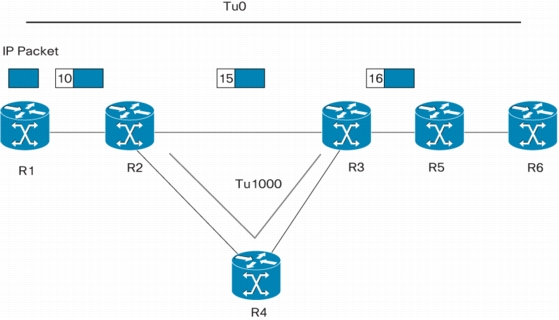
In smaller networks I usually see link protection used. For node protection you need a larger topology so this is not always possible, or when possible not very useful. Link protection is to ensure all links are secured using a backup path as the following drawing illustrates:

The primary tunnel follows the path R1-R2-R3-R5-R6 using MPLS labels according to the drawing. When the link between R2 and R3 fails a backup tunnel is signaled by R2 to R3, around the protected link. When the link breaks R2 pushes an additional label on top of the label stack and sends it to R4. Then R4 will pop off this label (PHP behavior) and R3 will see the standard label 15 as it usually expects.

Node protection (or link-node-protection)

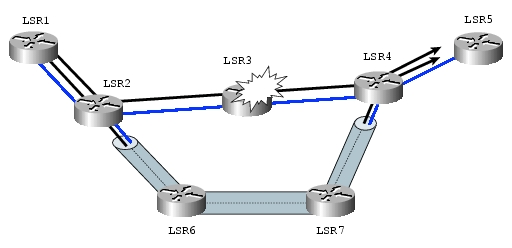
Node protection is used in larger environments to protect the link and the node in case of failures. As the name already says, this is the same technology as link protection, but then the backup path is signaled completely around the node, instead of just the link. As you can see in the previous example R3 is still used in transit and just it’s link to R2 is protected. In the following drawing you can see that LSR3 is fully protected as the backup path terminates on LSR4.

LSP / end-to-end protection

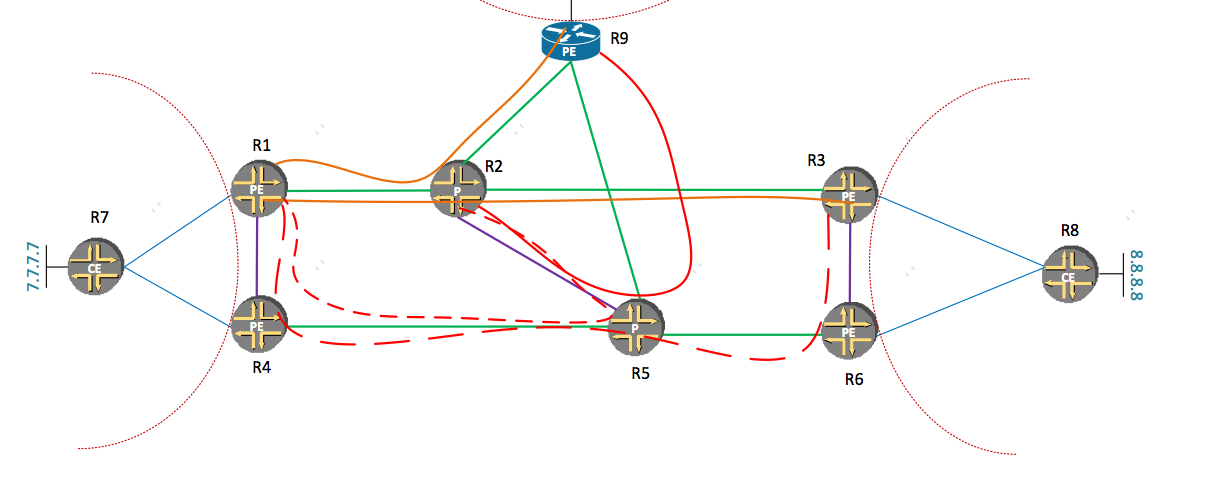
From what I’ve seen, Juniper is the only one that actually implements this. I’m sure it’s possible on Cisco as well, but when configuring the ‘fast-reroute’ command on a LSP it will signal a backup path through the network fully excluding any node/link that the primary path travels through. This sound pretty rigorous and it is J, but it makes sense in a square based (ladder) design as seen in the drawing below

The orange path from R1 to R3 is the primary tunnel and the red-large-dashed tunnel from R1 through R4, R5 and R6 is the back-up path that Juniper routers automatically signal when fast-reroute is enabled.

In smaller topologies with just a couple PE’s, this is do-able, but when your topology grows you require a backup path for every LSP and that can be hundreds or thousands in the larger deployments, making it very difficult to troubleshoot.

The other protections like link and node protection create a backup path around a specific link or node and all LSP’s that travel through those routers can use the same backup path in case of failures.

So when you have a specific case where you want end-to-end protection of your LSP, this is the way to go, but under normal circumstances I would recommend using link or node protection, which scales much better!

Interoperability

Now vendor interoperability is very important when it comes to Fast Rerouting. In the beginning when this was developed there were several drafts published that all used different objects in RSVP (DETOUR, BYPASS, etc.). Therefore some people might tell you that Cisco and Juniper FRR doesn’t work together.

This is long gone! But you have to configure it correctly. Like I already said, when you configure fast-reroute on a Cisco LSP it means it will use a backup tunnel when it’s available (manually configured). You require additional commands for creating the backups automatically (auto-tunnel), where you also configure whether you want link or node protection.

When you configure fast-reroute under a Juniper LSP it will signal a end-to-end protected path, which might not be what you want. You need to configure link or node-link protection under the Juniper LSP to advertise the desired protection. Then RSVP needs to be configured on each router to support either link and/or node-protection by enabling this under the interfaces configured in RSVP.

When configured correctly they perfectly interoperate!

RFC 4090 (http://tools.ietf.org/html/rfc4090) defines the finalized Fast Reroute standard, which is based on a draft by Avici. All vendors implemented this RFC and like I said, when configured with the correct commands, you can let them interoperate perfectly with each other.

Configuration

Below are some configuration examples. The first is a example of a Cisco IOS router. You see a tunnel configured and auto-tunnel being enabled to signal the backup path automatically for link-protection. Keep in mind that the backup tunnel needs to be configured on every node that you want link protection on. The ‘n-hop’ command configured ensures the link-protection, when ‘nnhop’ would be configured it would mean node-protection.

mpls traffic-eng auto-tunnel backup nhop-only 
interface Tunnel1
 ip unnumbered loopback0
 tunnel destination x.x.x.x
 tunnel mode mpls traffic-eng
 tunnel mpls traffic-eng path-option 1 dynamic
 tunnel mpls traffic-eng fast-reroute

The following example is for Juniper JUNOS routers. You see the same type of protection configured including the automatic protection for links. This is done using the link-protection command under the RSVP protocol. Additionally the same command needs to be configured under the LSP configuration.

[edit protocols]
mpls {
      label-switched-path lsp-name {
            to x.x.x.x;
            link-protection;
      }
}
rsvp {
      interface interface-name {
            link-protection;
      }
}


Summary

I hope I was able to give you a quick and brief overview of the different ways of protection for traffic engineering tunnels in MPLS networks. This was only one way of protecting traffic. Currently this is the most commonly used technology by service providers in the world, but others are rising that don’t require so much configuration, but do require tuning and sometimes specific network designs.

Stay tuned for the next blogpost about IP Loop Free Alternate!

Rick

JNCIE-ENT lab set-up

As I’m preparing for the various exams (up to the Expert lab) of the Enterprise Routing & Switching track of Juniper I needed a lab to support this. In this blogpost I would like to explain my choice of hardware and software and how I’m going to use this set-up to prepare for the written exams and the lab exam.

Hardware and Software

Based on the blueprint, available on the Juniper website (http://www.juniper.net/us/en/training/certification/resources_jncieent.html), I needed to select hardware and software. The current software version used in the lab is JUNOS 10.4. On the various communities I heard that they want to upgrade this to a JUNOS 11.x (probably 11.4, which is a long-term-support version) software track somewhere this year, but until that time I chose the latest version of 10.4. At time of this writing this is JUNOS 10.4R9.

On the official blueprint there is no real indication of which hardware is used on the lab exam, but when you find your ways through the community sites and with the help from some community friends (special thanks to Chris 😉 I decided to use the SRX100H as router and EX4200 as L3 switch.

The SRX and EX platforms are the platforms of choice for enterprise deployments. They are extensively used in the classroom trainings offered by Juniper and are according to the community used in the lab exam itself as well. Now the advantage of the SRX branch platform is that, in terms of features, all branch-office SRX devices are pretty much equal. Then I chose the lightest model with high memory (SRX100H) based on these reasons:

  • All features supported! (including MPLS, clustering, etc.)
  • Two units fit into one rackmount kit, saving space
  • Enough connectivity (no GigE, but who cares in a lab?)
  • High memory version to run multiple virtual routers with large routing tables
  • Very low cost!

For the switching layer I chose the EX4200 as virtual chassis technology is on the blueprint and the only 1G fixed switch supporting this is the EX4200. I chose the smallest model offering 24 GigE ports of which 8 are PoE enabled. The EX4200 is a full layer 3 switch and even capable of some MPLS features.

As the number of routers and switches is unknown (and under NDA of course) I chose a set-up in which I can practice anything. This means that I can do anything with two EX4200s as you can disable the virtual-chassis ports on the back from CLI. Therefore I can use the switches individually when this is necessary to practice for example spanning-tree stuff. The number of routers I chose six. You should be able to practice all kinds of routing and multicast stuff with 4 routers, but you also need backbone devices to inject routes or to act as multicast receiver or source. This is also a reason why I chose the high memory version of the SRX100, to ensure there is enough memory for multiple virtual-routers (routing-instances) with large routing tables. According to the Juniper specifications the SRX100 should only be capable of running 3 virtual-routers, but I already tested up to 10, so I guess this should run up to the memory is full as there is no fixed limitation. Same accounts for other ‘advanced’ features like BGP. On other SRX devices you need to have a license to support stuff like Route Reflection, but on the SRX100H this seems to work flawlessly!

One feature that isn’t available on the SRX100H is logical-systems. This is a way to spawn a new routing protocol daemon and therefore a separate configuration file and run multiple truly separated routers. Unfurtunately the branch SRX doesn’t support this, but I’m in the luxury position of also having two packed MX480 routers in my lab as well :).

Below is a picture of the physical lab set-up. I have the advantage that I can use the lab facilities of my employer, but this set-up is actually pretty silent. The SRX’s have external power supplies, the EX are the noisiest, but also pretty good to handle in a house environment when only used for labs.

Now the big advantage of the SRX100 is that the rack mount kit (separate item to order) can hold two units including a special space for the external power supply. I think this is very nicely done which creates an ultimate lab set-up experience. On the SRX all the connections including console are made on the front, so access to the back is not necessary. The EX switches however have console and management Ethernet ports on the back, including the virtual chassis ports (VCP). Although now shown on the picture, I connected the virtual chassis ports so I can practice virtual chassis technology. During the real lab you will have more switches, but for a practice lab you just need to practice how virtual chassis works and how multi-chassis LAGs and stuff work. After you practiced that you can disable the VCP ports using CLI commands and use the switches independently.

Study material

Now a tough part of the studying, especially lab exercises, is finding the right study materials. The only official Juniper training material is based on instructor-led courses. You require multiple courses to cover all material of a certain exam. Now you are able to order the books of these courses online, but there is no option to rent the lab environment used in those books. Now you do get the lab guides with those print-outs of the courses, so together with this SRX and EX topology you should be able to do all the labs that are taught in the courses, which might require some re-cabling, but on the other hand, as you will see below, my set-up offers a lot of virtualization options that you can use to create your own logical topology based on this single physical topology.

These kinds of set-ups are usually used in labs that are offered for rent, as you don’t want to be re-cabling your lab every time, especially not when it’s hosted overseas :-).

You can order the books of the courses by following this link (requires Juniper website credentials): http://www.onfulfillment.com/JuniperTrainingPublic/WelcomePublic.aspx?sid=323

Now the more publically available materials are the books published by O’Reilly. These books are officially not linked to Juniper, but they are developed with close attention and have a lot of specific information. There are multiple books available, but the ones that are of interest to the –ENT track are:

When read carefully these books should be enough to prepare you for all the exams in the –ENT track which consists of the following exams:

  1. JNCIA-Junos (JN0-101)
  2. JNCIS-ENT (JN0-343)
  3. JNCIP-ENT (JN0-643)
  4. JNCIE-ENT (JPR-943)

The first three are written exams that can be taken at Prometric testing centers around the world. The last exam (JNCIE-ENT) is a 8-hour proctored lab exam that is available at a few Juniper offices around the world. Now especially for the JNCIP-ENT and JNCIE-ENT you will need a lot of CLI experience and will need to do hands-on labs! Even though the JNCIP-ENT exam is a written test, you will be exposed to a lot of show and configuration outputs from the CLI where you will need to identify what’s wrong/correct/configured/etc. Therefore you really need a lot of exposure to the CLI and all of the possible quirks. Although my experience with Juniper exams is that they are straightforward and will not test you about exotic features, but really want you to know what is used in day-to-day networks and what you will see when working with this equipment in the Enterprise environment.

There is one company that offers custom JNCIE training. Proteus Networks (http://www.proteus.net) offers excellent boot camps and labs! I already used their proctored practice labs for my JNCIP-M and JNCIE-M lab and I really had a lot of advantages by doing them, so knowing what to expect on the lab was a huge advantage.

Currently they only offer remote proctored labs and a self-paced workbook for the JNCIE-SP exam, but they confirmed the same offering would become available for JNCIE-ENT very soon (2012)!

(Hint: When you like them on Facebook, you will get discount on your first purchase!)

For the written exams I will use the O’Reilly books and will practice all the technologies on my practice rack by just testing them out. This should prepare you more than enough to pass them. The combined use of the O’Reilly books and the soon-to-be-released self-paced and proctored labs of Proteus will prepare you well enough for the JNCIE-ENT lab exam! Or in the meanwhile use the labs from the instructor-led courses offered by Juniper or when you are creative yourself, just create labs yourself by coming up with a decent logical topology and by testing the more exotic features like multicast.

Finally there are the communities that you can use to ask questions and you will get some very intelligent and helpful people answer them. I use the following communities to ask my Juniper related questions:

  • J-Net forums (http://forums.juniper.net)
    • This is my primary source for asking questions. Quite some Juniper employees are very active on these forums. You can subscribe to them and receive e-mails once replies are available.
  • The Champion Community (http://www.thechampioncommunity.com)
    • Very new, but very promising!
  • GroupStudy Juniper mailing list (http://www.groupstudy.com)
    • Usually pretty silent, but there are some very intelligent people subscribed tot this mailing list that will answer to your queries

Topology

As I don’t want to be re-cabling my lab when I’m doing exercises I came up with a topology that offers me a lot of flexibility in creating all the logical topologies I need.  Therefore I connected a cable from every router to both switches. Interface 1 on each router connects to switch 1 where the port number corresponds to the router number. Interface 2 on each router connects to switch 2. Additionally I connected two routers to each other to test both interlinks between routers and test clustering (not a blueprint item for the –ENT track) functionality of the SRX.

As I don’t want to use the console port all the time, but just have an SSH session to my devices, I use a dedicated interface on every device connected to a third switch that is solely used for access to the rest of the network and also connecting to the internet. To ensure the management access (and required interface and routing configuration) does not interfere with the rest of the configuration of the devices I created a virtual-router routing-instance on each device to have the management routing configuration separated from the global routing table.

Configuration example:

system {
     services {
        ssh;
    }
}
interfaces {
    fe-0/0/0 {
        unit 0 {
            family inet {
                address <MGMT_IP>/24;
            }
        }
    }
}
routing-instances {
    MGMT {
        instance-type virtual-router;
        interface fe-0/0/0.0;
        routing-options {
            static {
                route 0.0.0.0/16 next-hop <DefGW>;
            }
        }
    }
}

This connectivity ensures flexibility as ports on the switch can be configured either as access, trunk or routed. So depending on the lab exercise that I want to do I will configure either one IP address on the interface, or tagged sub-interfaces on the routers. Therefore I’m able to create tons of interfaces, whenever necessary.

When configuring routing-instances, it is possible to connect only the sub-interface to the instance/system, so this also doesn’t require additional physical interfaces to be used.

One important thing configuration wise to not forget is by enabling packet-mode forwarding on the SRX devices. Within the exams and labs the SRX is used as an enterprise router instead of a security device, so the default flow-mode should be disabled.

You can do this with the following configuration followed by a reboot:

security {
    forwarding-options {
        family {
            inet6 {
                mode packet-based;
            }
            mpls {
                mode packet-based;
            }
        }
    }
}

Summary of connections per SRX:

  • fe-0/0/0 connects to management switch
  • fe-0/0/1 connects to SW1 ge-0/0/x
  • fe-0/0/2 connects to SW2 ge-0/0/x
  • fe-0/0/7 connects to fe-0/0/7on SRX according to the following mapping:
    • R1 <-> R2
    • R3 <-> R4
    • R5 <-> R6

Summary of connections per EX:

  • ge-0/0/1 connects to R1 fe-0/0/<1-2>
  • ge-0/0/2 connects to R2 fe-0/0/<1-2>
  • ge-0/0/3 connects to R3 fe-0/0/<1-2>
  • ge-0/0/4 connects to R4 fe-0/0/<1-2
  • ge-0/0/5 connects to R5 fe-0/0/<1-2>
  • ge-0/0/6 connects to R6 fe-0/0/<1-2>
  • ge-0/0/20 connects to SPsw<1-2> Gi1/0/14
  • ge-0/0/22 connects to SW<1-2> ge-0/0/22
  • ge-0/0/23 connects to SW<1-2> ge-0/0/23
  • me0 connects to management switch

The following diagram illustrates how all physical connections are made:


Summary

I hope I was able to give you an insight in how I built my JNCIE-ENT lab set-up and how I’m going to prepare for the written and practical exam(s). If you have any questions please don’t hesitate to comment on this post or ask questions on the community websites that I tipped in an earlier paragraph.

You will find me being active on those community websites as well!

Finally I wish you the best of luck in all of your current and future endeavors!

Stay hungry, stay foolish! 

My certification journey (J-Net)

This blog has also been published to the Juniper J-Net community portal

In 2005, when I was 18 years old, I finished high school I already knew what I wanted to do. I wanted to start a career in IT! The only thing I didn’t know was in what direction I wanted to go. So, I did a little bit of everything. The first important decision I took was to only finish high school and start working without going to university. I figured that, with enough dedication and focus, 4-5 years of work experience added with the right technical certifications would get me further in the IT world than a degree would get me. After 6 years I think I can say that it definitely worked for me!


Servers and Programming

I started with passing exams and getting my MCSE on Windows 2003. I had a few small companies where I was managing all IT systems. The largest one was my dad’s company where I was managing 4 servers, 10 workstation and 20 mobile devices (yes even in 2006 we had a custom developed Windows Mobile 5 application and all engineers were carrying smartphones). I was co-developing the custom application that all engineers used and developed the whole chain of processes and tasks that were both technically and business wise connected to that solution. It was an awesome project, especially when you are just 19 years old.


After passing my MCSE and completing the project at my dad’s company I was looking for a new challenge. As I was supporting a few smaller company networks and I figured I wanted to know more about what was going on across that UTP cable and I bought a Cisco CCNA book. When I finished the first chapters I was super enthusiastic, I couldn’t let go of the material and wanted to suck every last bit of information into my head!


After a little over a month I took the exam and failed it by only a few points! This was the first exam I ever failed and was much harder than every other exam I had taken before, besides it had high pass score. A week later I took the exam again and passed it with good points this time round! After only reading a few chapters in my first networking book I knew that this was what I wanted to do and where my destiny lay!


Starting in Networking

Now that I passed my CCNA I immediately continued working on my CCNP and within a year I passed the CCNP and only 9 months later I passed my CCIE Routing & Switching earning my ‘digits’ in the networking world!


Telindus-ISIT

After I got my CCIE number a lot changed! 3 months later I quit my job and took a job at a Cisco Gold and Juniper Networks Elite partnerTelindus-ISIT as a Support Engineer. I really liked the idea of my new role that instead of working on maintaining a network I had to convince customers about a new solution. Basically I sat across the other end of the table and after 3 years I can really say that this is a whole different ballgame!


Juniper

As I joined Telindus-ISIT I got in touch with Juniper hardware. Most of our ISP customers only buy Juniper Networks equipment and services from us. At first I really had to get used to JUNOS and as I was so aware of the Cisco portfolio I found it hard to get used to another product line-up. After spending almost 3 years at Telindus-ISIT I can really say I turned into a Juniper advocate! Once you get to know your way through the CLI and know the portfolio you hardly even think about going back.


Initially I didn’t focus too much on the Juniper certifications , I gained a few JNCIA-x titles, but after 2.5 years I decided it was time to finalize my Juniper certification journey by topping it off with a JNCIE title. I decided to pursue the JNCIE-M as I didn’t want to wait for the new certifications to go live, I wanted to pass it right then. After passing JNCIS-M by the end of 2010, I passed theJNCIP-M by February and the JNCIE-M by June. As for preparations I think I can call myself very lucky as most of the topics covered in the exams I worked with on a daily basis. This made it easier for me and I didn’t have to study that much for these labs. As I already knew all the technologies and having passed the relevant CCIE titles I only had to know the quirks and little differences with the JUNOS implementation and I could do the test. I know this is not comparable when you are a ‘normal guy’ studying for this, but as I work for ISP customers every day and use these technologies every day I didn’t find these exams very hard to pass. I loved them though! The setup of the Juniper lab exams is so much more realistic than any other vendor exam I have taken. You are not asked to configure a crazy network with every nasty feature in there, but you are asked to configure the best network. You can even configure your own best practices. As long as they fall within the requirements you can configure the network just as you are used to.


Future

After gaining four ‘expert’ titles in networking I’m still thinking of a way to continue my professional growth. I think the most important thing is that I use all knowledge I have gained. I love my work and the variety of challenges I’m faced with and I hope to do this for many years in whatever that position may be.


Finally, if there’s one piece of advice I can leave you with, it would be to start your certification journey you never know where it is going to lead to in the future. I hope you have found my story interesting, would be good to hear from you on your experiences please post your comments below.

Newer posts »

© 2025 Rick Mur

Theme by Anders NorenUp ↑