Limitless Networking

Tag: Juniper

BRAS on Juniper MX

One of the latest features on the Juniper MX-series devices is the BRAS functionality. The first functionality (automatically configuring interfaces) has been available since a long time, but most BRAS features have been introduced last year in JUNOS 11.x releases. With JUNOS 11.4 (also a Long-Term-Support release) the features matured as all major components are now available and (fingers crossed) stable.

This functionality can be named in different ways. BRAS or Broadband Remote Access Server is the most common name. Other names are Broadband Network Gateway (BNG) or Broadband Service Router (BSR).

This functionality is used in Internet Service Provider environments usually where DSL or Cable is used as the last mile access.

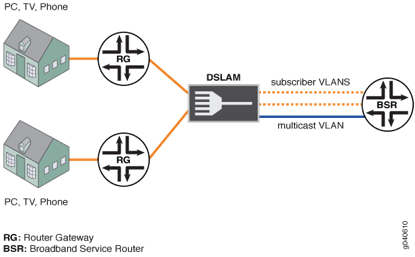
The following drawing demonstrates how the end-to-end path looks and where a BRAS/BSR is placed.

The CPE (DSL/Cable modem) is connected to the Multi-Service Access Node (MSAN), this MSAN is either a DSLAM in case of DSL networks or a CMTS in case of Cable networks. The DSLAM and CMTS devices convert the signal to Ethernet (or any other transport) and forward it to the rest of the network. This connection is then terminated on a BRAS device before it enters the rest of the network (and the internet).

The BRAS is used for 2 reasons. The first is for authenticating the client if it has the right to enter the network. Second is to enforce the subscription in terms of bandwidth limits and services that the client bought.

In the more classical model, when ATM was mostly used as transport layer, the identification of subscribers (as how clients are called on BRAS devices) where identified using PPP sessions. A client or CPE device initiates a PPP session. This ensures for encapsulation between client and BRAS and ensures some sort of circuit where you can apply authentication and enforce traffic control polices. Authentication of the client is very easy from the service provider standpoint, as a user has a username and password, which it needs to enter before getting authorized to the network. This is a little more hassle for the user as they need to know these values and have knowledge how to configure a ppp session, either on the CPE (modem) or on end-hosts.

The more modern/current approach to BRAS deployments is first of all using Ethernet as the transport layer for the usual reasons that Ethernet is very cheap and offers a lot of flexibility and now with the OAM features as 802.1ag it’s becoming very mature to use as carrier transport layer. Together with using Ethernet more flexible options become available as Ethernet utilizes the DHCP protocol for address assignments. This enables a very dynamic approach to enabling users on the network, but requires some administration by the ISP.

Traffic separation on Ethernet is ensured using IEEE 802.1Q based VLAN tags. This is done in 2 ways. Either using a single VLAN (per PoP or per service), which is called the S-VLAN model, or by using a separate VLAN for every customer (C-VLAN). In the C-VLAN model there are usually 2 tags stacked on each other as 4000 VLAN numbers is not enough for service provider scaling, so an additional tag is stacked which gives 4000×4000=16.000.000 combinations. Which should be more than enough for a single interface. This means that these models are not strictly compliant to any MEF or IEEE standard. It’s just terminology used in the BNG deployments.

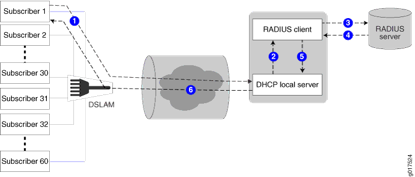
The “Life of a packet” in the DHCP BRAS model:

  1.   CPE (modem / settopbox) is shipped to the client,
  2.   CPE MAC addresses are registered with back office systems of the ISP.
  3.   When installed the CPE issues a DHCP Offer message towards the network
  4. The packet is tagged with one or more VLAN (802.1Q) tags by the MSAN
  5. The tagged packet is received by the BRAS and depending on the VLAN tag combination a sub-interface (unit / IFL) is created dynamically according to pre-defined variables.
  6. In case of the S-VLAN model, there are still multiple subscribers sharing the same sub-interface, which limits the possibilities for configuration. Another sub-interface per subscriber is necessary. This will be based on the source IP address. This process is called ‘demux’ and uses the virtual demux0 interface within JUNOS. Within this process another sub-interface is created on top of the demux0 interface, which now ensures enough uniqueness.
  7. After the customer uniqueness is ensured the BRAS picks up the DHCP message and processes all possible options (within option 60 or 82, several properties can be set on which the MX can act).
  8. Next step is to send a request to the AAA server. The username that is used can be based on DHCP options or MAC address, or any custom keyword
  9. After authentication the AAA server responds with several attributes that fill in the variables of the configuration of the sub-interface.
  10. Finally a DHCP server is requested to hand out an IP address (can be local on the MX or remote through DHCP relay)
  11. Then finally everything comes together and the IP address is bound to the newly created sub-interface along with all properties as described in the profile and the variables that are sent with RADIUS attributes
  12. After the sub-interface is created the DHCP process is finalized using a DHCP Offer, Request, Accept and the client can access the network!

This was to give you a brief introduction into the BRAS functionality now with the widely deployed DHCP model. The main functionality that is now available to enable all this on the MX is the auto-configuration of sub-interfaces and the use of variables that can be filled in using RADIUS attributes.

During JUNOS 11.x releases the functionality matures and important things like GRES (supporting routing engine fail-overs) and versioning (changing profile configuration while subscribers are using that profile) became available and as of JUNOS 11.4 all major features are implemented.

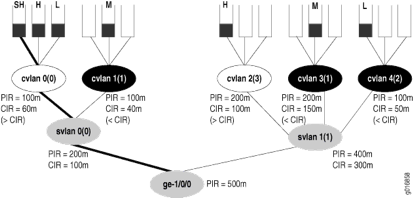
Please be aware of the platform that you choose to run the BRAS functionality on. As all the auto-configuration is performed on the routing-engine a fast RE is recommended! The new quad-core (RE-S-1800×4) routing-engine delivers blazing fast performance and enormous scaling in terms of IFLs (units / logical interfaces). When you want to deliver correct Class of Service for thousands of subscribers using a model for having various queues ensuring correct prioritization of voice/video traffic and shaping according to the bandwidth plan the customer bought you will need a feature called H-QoS (H for Hierarchical).

The per VLAN/subscriber scheduling and shaping is only available on the Q or EQ line cards on the MX platform. If you only want to use VLAN policing than you are good with a standard Trio/Cassis-based line card.

Within this model, you assume no control over the MSAN (CMTS or DSLAM), so to control the uplink bandwidth of the user you need input shapers to slow down the incoming traffic. With the Q and EQ linecards this is also possible as the queues can be distributed across both input and output traffic. To ensure correct scheduling for voice and video traffic the BRAS expects traffic to be marked with the correct DSCP and/or IP Precedence bits.

I hope you enjoyed my blog, please leave a comment if you have questions.
JNCIE-ENT lab set-up

As I’m preparing for the various exams (up to the Expert lab) of the Enterprise Routing & Switching track of Juniper I needed a lab to support this. In this blogpost I would like to explain my choice of hardware and software and how I’m going to use this set-up to prepare for the written exams and the lab exam.

Hardware and Software

Based on the blueprint, available on the Juniper website (http://www.juniper.net/us/en/training/certification/resources_jncieent.html), I needed to select hardware and software. The current software version used in the lab is JUNOS 10.4. On the various communities I heard that they want to upgrade this to a JUNOS 11.x (probably 11.4, which is a long-term-support version) software track somewhere this year, but until that time I chose the latest version of 10.4. At time of this writing this is JUNOS 10.4R9.

On the official blueprint there is no real indication of which hardware is used on the lab exam, but when you find your ways through the community sites and with the help from some community friends (special thanks to Chris 😉 I decided to use the SRX100H as router and EX4200 as L3 switch.

The SRX and EX platforms are the platforms of choice for enterprise deployments. They are extensively used in the classroom trainings offered by Juniper and are according to the community used in the lab exam itself as well. Now the advantage of the SRX branch platform is that, in terms of features, all branch-office SRX devices are pretty much equal. Then I chose the lightest model with high memory (SRX100H) based on these reasons:

  • All features supported! (including MPLS, clustering, etc.)
  • Two units fit into one rackmount kit, saving space
  • Enough connectivity (no GigE, but who cares in a lab?)
  • High memory version to run multiple virtual routers with large routing tables
  • Very low cost!

For the switching layer I chose the EX4200 as virtual chassis technology is on the blueprint and the only 1G fixed switch supporting this is the EX4200. I chose the smallest model offering 24 GigE ports of which 8 are PoE enabled. The EX4200 is a full layer 3 switch and even capable of some MPLS features.

As the number of routers and switches is unknown (and under NDA of course) I chose a set-up in which I can practice anything. This means that I can do anything with two EX4200s as you can disable the virtual-chassis ports on the back from CLI. Therefore I can use the switches individually when this is necessary to practice for example spanning-tree stuff. The number of routers I chose six. You should be able to practice all kinds of routing and multicast stuff with 4 routers, but you also need backbone devices to inject routes or to act as multicast receiver or source. This is also a reason why I chose the high memory version of the SRX100, to ensure there is enough memory for multiple virtual-routers (routing-instances) with large routing tables. According to the Juniper specifications the SRX100 should only be capable of running 3 virtual-routers, but I already tested up to 10, so I guess this should run up to the memory is full as there is no fixed limitation. Same accounts for other ‘advanced’ features like BGP. On other SRX devices you need to have a license to support stuff like Route Reflection, but on the SRX100H this seems to work flawlessly!

One feature that isn’t available on the SRX100H is logical-systems. This is a way to spawn a new routing protocol daemon and therefore a separate configuration file and run multiple truly separated routers. Unfurtunately the branch SRX doesn’t support this, but I’m in the luxury position of also having two packed MX480 routers in my lab as well :).

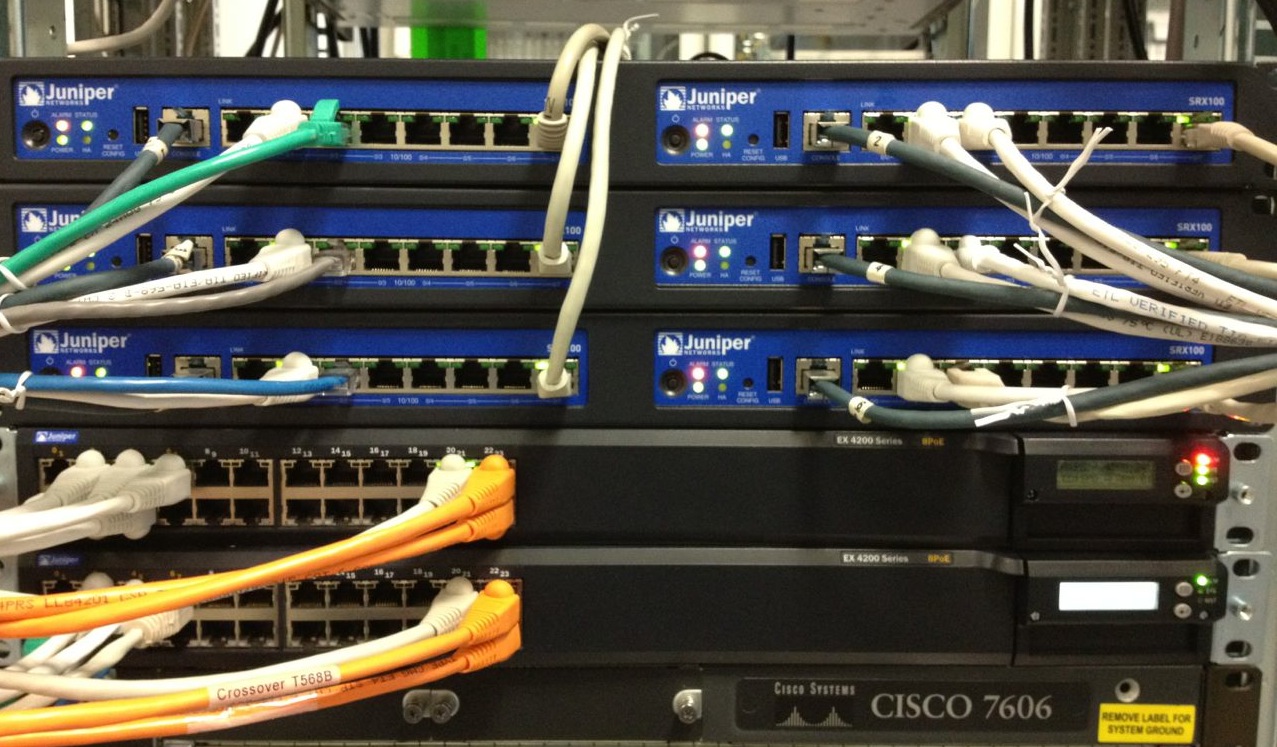
Below is a picture of the physical lab set-up. I have the advantage that I can use the lab facilities of my employer, but this set-up is actually pretty silent. The SRX’s have external power supplies, the EX are the noisiest, but also pretty good to handle in a house environment when only used for labs.

Now the big advantage of the SRX100 is that the rack mount kit (separate item to order) can hold two units including a special space for the external power supply. I think this is very nicely done which creates an ultimate lab set-up experience. On the SRX all the connections including console are made on the front, so access to the back is not necessary. The EX switches however have console and management Ethernet ports on the back, including the virtual chassis ports (VCP). Although now shown on the picture, I connected the virtual chassis ports so I can practice virtual chassis technology. During the real lab you will have more switches, but for a practice lab you just need to practice how virtual chassis works and how multi-chassis LAGs and stuff work. After you practiced that you can disable the VCP ports using CLI commands and use the switches independently.

Study material

Now a tough part of the studying, especially lab exercises, is finding the right study materials. The only official Juniper training material is based on instructor-led courses. You require multiple courses to cover all material of a certain exam. Now you are able to order the books of these courses online, but there is no option to rent the lab environment used in those books. Now you do get the lab guides with those print-outs of the courses, so together with this SRX and EX topology you should be able to do all the labs that are taught in the courses, which might require some re-cabling, but on the other hand, as you will see below, my set-up offers a lot of virtualization options that you can use to create your own logical topology based on this single physical topology.

These kinds of set-ups are usually used in labs that are offered for rent, as you don’t want to be re-cabling your lab every time, especially not when it’s hosted overseas :-).

You can order the books of the courses by following this link (requires Juniper website credentials): http://www.onfulfillment.com/JuniperTrainingPublic/WelcomePublic.aspx?sid=323

Now the more publically available materials are the books published by O’Reilly. These books are officially not linked to Juniper, but they are developed with close attention and have a lot of specific information. There are multiple books available, but the ones that are of interest to the –ENT track are:

When read carefully these books should be enough to prepare you for all the exams in the –ENT track which consists of the following exams:

  1. JNCIA-Junos (JN0-101)
  2. JNCIS-ENT (JN0-343)
  3. JNCIP-ENT (JN0-643)
  4. JNCIE-ENT (JPR-943)

The first three are written exams that can be taken at Prometric testing centers around the world. The last exam (JNCIE-ENT) is a 8-hour proctored lab exam that is available at a few Juniper offices around the world. Now especially for the JNCIP-ENT and JNCIE-ENT you will need a lot of CLI experience and will need to do hands-on labs! Even though the JNCIP-ENT exam is a written test, you will be exposed to a lot of show and configuration outputs from the CLI where you will need to identify what’s wrong/correct/configured/etc. Therefore you really need a lot of exposure to the CLI and all of the possible quirks. Although my experience with Juniper exams is that they are straightforward and will not test you about exotic features, but really want you to know what is used in day-to-day networks and what you will see when working with this equipment in the Enterprise environment.

There is one company that offers custom JNCIE training. Proteus Networks (http://www.proteus.net) offers excellent boot camps and labs! I already used their proctored practice labs for my JNCIP-M and JNCIE-M lab and I really had a lot of advantages by doing them, so knowing what to expect on the lab was a huge advantage.

Currently they only offer remote proctored labs and a self-paced workbook for the JNCIE-SP exam, but they confirmed the same offering would become available for JNCIE-ENT very soon (2012)!

(Hint: When you like them on Facebook, you will get discount on your first purchase!)

For the written exams I will use the O’Reilly books and will practice all the technologies on my practice rack by just testing them out. This should prepare you more than enough to pass them. The combined use of the O’Reilly books and the soon-to-be-released self-paced and proctored labs of Proteus will prepare you well enough for the JNCIE-ENT lab exam! Or in the meanwhile use the labs from the instructor-led courses offered by Juniper or when you are creative yourself, just create labs yourself by coming up with a decent logical topology and by testing the more exotic features like multicast.

Finally there are the communities that you can use to ask questions and you will get some very intelligent and helpful people answer them. I use the following communities to ask my Juniper related questions:

  • J-Net forums (http://forums.juniper.net)
    • This is my primary source for asking questions. Quite some Juniper employees are very active on these forums. You can subscribe to them and receive e-mails once replies are available.
  • The Champion Community (http://www.thechampioncommunity.com)
    • Very new, but very promising!
  • GroupStudy Juniper mailing list (http://www.groupstudy.com)
    • Usually pretty silent, but there are some very intelligent people subscribed tot this mailing list that will answer to your queries

Topology

As I don’t want to be re-cabling my lab when I’m doing exercises I came up with a topology that offers me a lot of flexibility in creating all the logical topologies I need.  Therefore I connected a cable from every router to both switches. Interface 1 on each router connects to switch 1 where the port number corresponds to the router number. Interface 2 on each router connects to switch 2. Additionally I connected two routers to each other to test both interlinks between routers and test clustering (not a blueprint item for the –ENT track) functionality of the SRX.

As I don’t want to use the console port all the time, but just have an SSH session to my devices, I use a dedicated interface on every device connected to a third switch that is solely used for access to the rest of the network and also connecting to the internet. To ensure the management access (and required interface and routing configuration) does not interfere with the rest of the configuration of the devices I created a virtual-router routing-instance on each device to have the management routing configuration separated from the global routing table.

Configuration example:

system {
     services {
        ssh;
    }
}
interfaces {
    fe-0/0/0 {
        unit 0 {
            family inet {
                address <MGMT_IP>/24;
            }
        }
    }
}
routing-instances {
    MGMT {
        instance-type virtual-router;
        interface fe-0/0/0.0;
        routing-options {
            static {
                route 0.0.0.0/16 next-hop <DefGW>;
            }
        }
    }
}

This connectivity ensures flexibility as ports on the switch can be configured either as access, trunk or routed. So depending on the lab exercise that I want to do I will configure either one IP address on the interface, or tagged sub-interfaces on the routers. Therefore I’m able to create tons of interfaces, whenever necessary.

When configuring routing-instances, it is possible to connect only the sub-interface to the instance/system, so this also doesn’t require additional physical interfaces to be used.

One important thing configuration wise to not forget is by enabling packet-mode forwarding on the SRX devices. Within the exams and labs the SRX is used as an enterprise router instead of a security device, so the default flow-mode should be disabled.

You can do this with the following configuration followed by a reboot:

security {
    forwarding-options {
        family {
            inet6 {
                mode packet-based;
            }
            mpls {
                mode packet-based;
            }
        }
    }
}

Summary of connections per SRX:

  • fe-0/0/0 connects to management switch
  • fe-0/0/1 connects to SW1 ge-0/0/x
  • fe-0/0/2 connects to SW2 ge-0/0/x
  • fe-0/0/7 connects to fe-0/0/7on SRX according to the following mapping:
    • R1 <-> R2
    • R3 <-> R4
    • R5 <-> R6

Summary of connections per EX:

  • ge-0/0/1 connects to R1 fe-0/0/<1-2>
  • ge-0/0/2 connects to R2 fe-0/0/<1-2>
  • ge-0/0/3 connects to R3 fe-0/0/<1-2>
  • ge-0/0/4 connects to R4 fe-0/0/<1-2
  • ge-0/0/5 connects to R5 fe-0/0/<1-2>
  • ge-0/0/6 connects to R6 fe-0/0/<1-2>
  • ge-0/0/20 connects to SPsw<1-2> Gi1/0/14
  • ge-0/0/22 connects to SW<1-2> ge-0/0/22
  • ge-0/0/23 connects to SW<1-2> ge-0/0/23
  • me0 connects to management switch

The following diagram illustrates how all physical connections are made:


Summary

I hope I was able to give you an insight in how I built my JNCIE-ENT lab set-up and how I’m going to prepare for the written and practical exam(s). If you have any questions please don’t hesitate to comment on this post or ask questions on the community websites that I tipped in an earlier paragraph.

You will find me being active on those community websites as well!

Finally I wish you the best of luck in all of your current and future endeavors!

Stay hungry, stay foolish! 

© 2024 Rick Mur

Theme by Anders NorenUp ↑