A typical Network Virtualization demo is difficult as you need quite some hypervisor hosts to run some VMs on and interconnect them using Overlays. I solve this using nested virtualization. This means that I run a hypervisor running on another. This gives me the flexibility that my physical nodes, or “hypervisor underlay” if you will, can scale easily and I’m independent of them.
My physical cluster consists of 2 nodes running ESXi with vCenter. On top of that I’m running 4 other ESXi hosts divided in 2 “virtual” clusters and 4 KVM hosts as Contrail Compute Nodes.
How does this work?
This technology works using Intel’s VT-x (which is hardware assisted virtualization) and EPT (to virtualise memory allocations). This combination works since the “Nehalem” arch itecture (released 2008). The technology is ported to the more “Desktop” oriented CPU’s as well, so there is a good chance your notebook supports it as well. Since the Haswell architecture the nested virtualization works even better as Intel now supports VMCS Shadowing for nested VMs, which creates a data structure in memory per VM (and now supports nested VMs as well, which used to be a software effort).
Memory is the biggest burden in these nested set-ups. CPU performance is always hardware assisted, so nested VMs almost feel the same as regular VMs. The problem is that ESXi itself requires 4GB of memory to run, it requires around 2GB to run properly. So get at least a 32GB server, otherwise you run out of memory very fast!
The amount of nested virtualization is technically unlimited. So you could have 2, 3 or 4 levels deep. Where at some point to use-case becomes very small of course. The same goes for 32-bit and 64-bit machines. As long as your physical CPU is a 64-bit one (32-bit CPU’s do not support VT-X or EPT) you are able to run 32-bit and 64-bit guests inside a nested ESXi installation running on top of ESXi.
Set-up
I’m using ESXi as my main hypervisor as it has the best management tools currently out and most of my customers are using it. This gives me a stable foundation. So this set-up is based on the ESXi version of configuration. I’m using the latest version of ESXi as of this writing (5.5u2). To set-up nested virtualisation properly you have to use at least Virtual Machine hardware version 9 or 10. This means you have to configure this using the vSphere Web Client and therefore vCenter Server (Appliance) is also required to be running in your lab. I would also recommend to give your virtual ESXi at least 2 vCPU’s (no performance difference in allocating cores or sockets) and sufficient memory. Remember that ESXi will consume about 2GB to run for itself and the rest you can allocate to VM’s. Depending on the amount of nested VM’s you want to run I gave 6GB of memory to my ESXi as I’m only running 3-4 guest VM’s on this nested hypervisor.
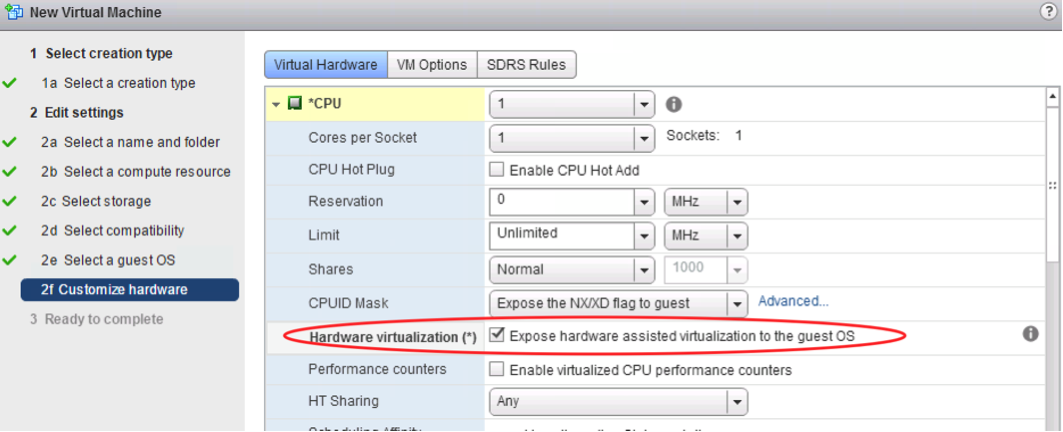
CPU
The most important setting is when you open up the “CPU” panel in VM settings. There you have to enable “Expose hardware assisted virtualisation to the guest OS”. This will enable the exposure of the Intel VT-x feature towards the VM and will enable ESXi to recognize a virtualization capable host. If this checkbox is greyed out, it means your CPU is not suitable for nested virtualization.
(The same steps are required to install nested KVM inside ESXi, Hyper-V may require some additional tweaking)
Networking
After installing ESXi inside the VM you are almost up and running! First of all you probably want to allow VLAN tagging to go towards the nested ESXi and for VLAN tags to come from the vSwitch running inside the nested ESXi. This requires a port group that is set for VLAN Trunking. I’m using a Standard vSwitch, not a Distributed vSwitch (DVS) on my physical cluster, because of the fact that the vCenter server has to be up and running to be able to power on a VM on a DVS. Because I will be playing around with this environment I can’t rely on vCenter being up all the time. So therefore I chose to use Standard vSwitches on the physical cluster. As I will experiment with networking features on the nested ESXi installations. To create a VLAN trunking capable Port Group, you have to create this on each physical host separately and allow a VLAN tag of “all” or “4095”.

This will make sure that my network inside the nested ESXi installation is VLAN tagging capable!
Now before this will work fine, we need to change one more setting on our physical cluster ESXi installation.ESXi by default considers itself to be the master of the network (at least inside the ESXi environment). Because ESXi is generating the MAC addresses that the VMs use it doesn’t allow any other MAC addresses to enter the vSwitch coming from a virtual interface. This is a great security feature and definitely helps a lot in preventing all kinds of network attacks to be based from inside the VM. Because we will be having a whole new ESXi installation that is generating it’s own MAC addresses we do want to allow unknown MAC addresses to enter on the virtual interfaces connecting to the nested ESXi VMs. To enable this you have to allow the “Promiscuous mode” on the vSwitch or on the port groups you applied to the ESXi VM. I enabled it on the vSwitch itself, just to be sure not having to worry about it when I create a new port group. Remember to change this setting on all of your physical hosts when using a Standard vSwitch. Make sure to change “Promiscuous mode” to “accept” and that “Forged transmits” and “MAC address changes” are also set to “accept”, but that’s the default.
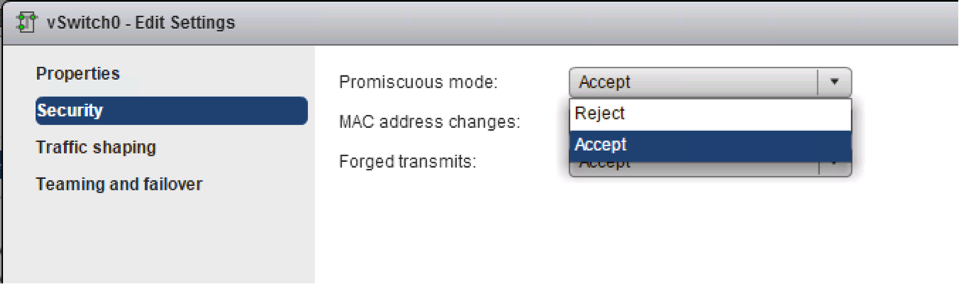
Now Promiscuous mode does impact performance on your ESXi server. ESXi has no concept of MAC learning like a regular Ethernet Switch. This means that when we disable the security control of MAC addresses being assigned to the virtual interfaces (promiscuous mode) we will flood all traffic to all of the ports inside the vSwitch. With regular feature testing you won’t generate much data traffic, but when you do get to a few Mbps of traffic, this could impact CPU performance quite a lot. There is a plug-in that will enable MAC learning on interfaces that you configure it for. This does require a Distributed Virtual Switch to be running in the physical cluster. You can find it, together with implementation details, here: https://labs.vmware.com/flings/esxi-mac-learning-dvfilter
I would not recommend using it in tests with a lot of NFV appliances (virtual firewalls, virtual routers, etc.), as the entries learnt through this filter will not age out. This means that when your nested Guest VMs are moving a lot, it will register that MAC address on each port meaning the performance improvements will go away. If you have a stable environment then this MAC learning feature will be beneficial. More details are found in this excellent blog: http://www.virtuallyghetto.com/2014/08/new-vmware-fling-to-improve-networkcpu-performance-when-using-promiscuous-mode-for-nested-esxi.html
VMtools
The final optimization that can be done when you are running ESXi as a VM is to run VMware Tools. This will make sure that a graceful shutdown can be done and makes your life a bit easier when it comes to IP addressing and have visibility inside vCenter. The default VMware tools do not support ESXi, you require to have the version installed found here: https://labs.vmware.com/flings/vmware-tools-for-nested-esxi
Summary
When everything is installed I highly recommend creating a separate cluster for these nested hypervisors and keep your physical cluster clean. Now you are ready to deploy VM’s just as you are used to, but now inside a safe environment where you can start breaking things!
Happy Labbing!

Hi Rick,
For resolve problem with mac-learning can use Cisco Nexus 1000V. This vDS uses classical mac-learning algorithms.
Correct! However, I do prefer a vanilla environment for my foundation platform (the physical servers). Especially when you are troubleshooting a new feature you are testing in the nested environment.